Sunday, 30 September 2012

A fantastic building


We took a day out yesterday to attend StampEx which is held twice a year at the Design Centre, Islington. Our main reason for going is to attend the GBPS (Great Britain Philatelic Society) meeting which is held in one of the rooms upstairs on the balcony.  This is a fitting venue for a philatelic event as the building was used as a Royal Mail parcels office during the second world war after Mount Pleasant  was severely damaged during a bombing raid. On 18 June 1943 a single incendiary bomb destroyed the Parcel Section at Mount Pleasant More information can be found regarding the building's history HERE.

This year the format of the meeting was changed and we found that we could only attend the morning session if we were to have any time to peruse the many exhibition frames and dealers stands. Everybody who is anybody attends this event including Royal Mail themselves selling recent and current issues at face value. Sue managed to complete the paralympics gold winners set of mini sheets. having only managing to buy 12 out of the 34 issued over the counter at our local main post office.
As you can see from the photograph the venue is a fantastic building dating back to 1861, it was completely refurbished, extended and modernised in the 1980s making it one of the most practical uses of space in a very good location. Lots of good modelling reference in that clear-span roof which, in its day was greater that that of the Crystal Palace and Alexandra Palace.

A good day out and a very nice BLT at a reasonable price -  Now, come on, you knew I was going to mention food at some point, didn't you?

Ralph

Saturday, 29 September 2012

Now look what happens when you do someone a favour...


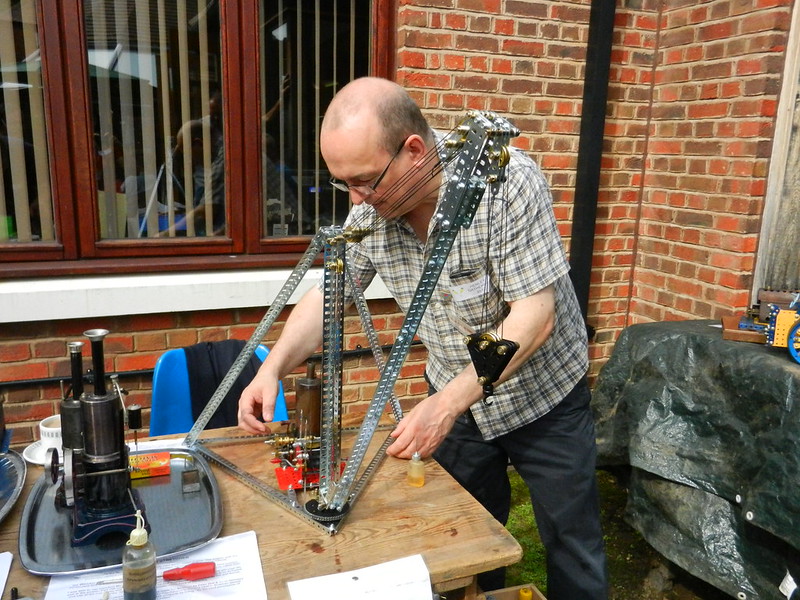
Back at the beginning of the month we had a day out at The Henley Gathering, an annual meeting of Meccano enthusiasts. For the past few years now, we have been showing off our ancient steam engines. This year we decided to go one step further and build one of our 1929 steam engines into a model. The model we decided to build was a Derrick Crane featured in the original steam engine manual. After spending the day steaming we arrived home just as our neighbour was pulling in to the kerb bearing something that looked interesting… " I have a Steam engine for you!"

More steam!

A shadow of its former self - Meccano steam engine Mec1
01_te_before It all started a few months ago when the aforementioned neighbour asked if I could give her and her husband a hand to clear out her late father's workshop. (Self improvement tip: If you want to make lots of friends buy yourself a big van!) The workshop was full of woodworking and turning tools so the offer of a first pick was tempting. As we worked our way around the workshop sorting out the wheat from the chaff - and we all have lots of chaff! I spotted a Mamod Traction Engine sitting in a box. It turned out it belonged to my neighbours brother and as such was not part of the task in hand.

Nothing more was said until, a couple of days before we went to Henley, when in passing mentioned that I could be interested in That Mamod steam traction engine. So all of a sudden I was the owner of a steam engine that did not have ‘Meccano’ written on it.

That was it, I needed to know a bit more about these engines so before long I was actively seeking scruffy looking examples to take to bits and bring back to life. For the past few weeks in between all the domestic jobs I have found myself fiddling about with all sorts of steam engines. I have a small stock of both stationary and mobile engines that I will be refurbishing between other projects over the next few months so Life in the workshop is going to be interesting to say the least. 

Live steam in the workshop - Look mum, no hands!
I think you might see a little more on this...
At one end of the workshop I am trying to get to grips with the latest electronic microprocessors while at the other end I am burning my fingers on steam powered models. It should be interesting so keep looking back in or sign up for e-mail notifications at the top of the page. I am back in the workshop and back blogging! 

Ralph.

Saturday, 22 September 2012

One thing leads to another…

No playing in the workshop for a while as life, a nasty dose of a Flu-like bug, the Olympics and the odd wedding has taken up any spare time I have had. The only workshop time of late has been to do what our American friends call ”Honey dos” that is; things that need doing around the house that I have been avoiding!

A few scraps, a strip of leather and a piece of MDF...
Have you ever tried removing a cupboard from under a kitchen worktop – without removing the worktop? This is usually a fairly straightforward job. Modern Kitchen cabinets are usually fitted with adjustable legs, so it is just a case of undoing any carcass-to-carcass joiners, letting down the legs and pulling it out. This is fine if it is a normal 565mm deep cabinet but when the cabinet is a corner cabinet the corner leg is too far away to release with any ease. A touch of the old brute force released the cabinet but the corner leg was detached from the carcass in the process. This is not a problem in itself as it is an easy job to reattach – But – How do I get it back without damaging it again?
...and you have the "lift 'n' shove!
A rummage in the timber scrap box produced a selection of bits that, after a bit of shaping, drilling and nailing, produced the Mk I corner cabinet lift ‘n’ shove. The whole idea is to take the weight off that back leg while the cabinet is pushed into its final position. A good rub of candle wax is applied to the sledge to reduce friction against the floor. Conversely, the lifting pad is surface is covered with non slip matting. This is intended for use under loose floor mats and rugs to prevent them from sliding on a polished floor. It can be purchased from carpet shops and is also available in some hardware stores. It is similar to the material (which attracts a much higher price) sold as ‘router mat’ for use with power routers to prevent the work-piece from sliding about while being machined. This did the job fine but a small modification to keep the pad in place while being positioned will be an advantage.

Hot stuff… 

Panel filler used to repair laminate worktop
While in the kitchen fiddling about I thought I would repair the laminate worktop where something very hot had made a small blister, about the size of a five pence piece. A tap with a hammer shattered the burnt laminate and a fine-set block plane trimmed the raised edge. The remainder of the derbies was removed and a small amount of automotive epoxy panel filler (Isopon, plastic padding or the like) was used to fill the void. This was allowed to cure thoroughly before the over fill was levelled using wet and dry abrasive. The filler is a reasonably close match, in colour, to this worktop so it will not take much to touch this up with a bit of airbrushing and a splatter paint effect applied using an old toothbrush and knife.

Stop rot 

Many years ago, we had all the windows replaced and double glassed. While the work was being done the back door and frame was replaced. That was 25 years ago or more. The hardwood threshold has held out very well considering it has been in contact with the shallow step. Hmmm… Looks like another ‘do’ for ‘Honey’.

The first job was to rectify the source of the problem and remove the pointless step. The slabs were lifted, the bricks and infill were smashed out (I like this bit) with my trusty ‘lump’ hammer (might as well keep to the American vernacular – AKA a club hammer) and bolster. Next, time to remove the remains of the threshold. This is not as easy as it may seem. The doorframe and threshold were made as one piece and fitted in to the opening. I know these sort of jobs can escalate but I am not about to take the b****y doorframe out! The problem is the threshold is nailed into the bottom of the frame from underneath.
Having done this job several times before I have a plan…

This involves a fantastic piece of kit, which you may not of heard of, made by the inventers of the cordless drill – Fien. The Fien Oscillating Power Tool is a get-out-of-jail tool that has earned its money, time and time again over the years. Fitted with a E-cut or circular blade it will slip in between the frame and the threshold and cut straight through the nails – magic! Time to resort to the woodworking machines. I had a lump of maranti earmarked for this job but on closer inspection, it turned out to be too small in section. As luck would have it, Sue happens to own a big pile of hard wood (earmarked for turning activities) Acquired a few years ago when it was on offer cheap so long as it could be collected – See I told you owning a van makes you popular. About half way down the stack was a good-looking lump of American white oak – perfect! Not only that but managed to release it from the stack out without a fight. A couple of passes through the table saw and thicknesser and we have the basis of a threshold. It was cut to length, shaped, scraped and treated with finishing oil.

Nice new stop - American white oak off-cut
A couple of slabs that were too close to the timber were repositioned and a threshold support was cast in-situ. The new lump of oak was bedded onto a length of DPC and secured to the frame with a couple of screws driven through pocket holes cut into the uprights. All that need doing now is to make good the render and get the paint out. I'll give the door a fresh coat of paint and... Is that the doorbell? Now you would think that after all that, plus a couple of smaller jobs, a bloke would be able to get back to some serious workshop time... No chance.

Ding-dong!

“Do you think Ralph could look at my window?” Sue had answered the door (never a good plan!) to our neighbour who had decided that repairing 115 year old sash windows was just a case of filling in the “soft bits”. There was no way I was going to get too involved in this madness so I made a few suggestions and left… So why am I carrying a top light (window sash)? Usual story, it was easier to do the job than explain it. So back to the workshop and the woodworking machines. This time the table saw and band saw got a bashing and a new meeting rail was fabricated, the rest of the sash was sound enough to reuse so the new meeting rail was trimmed and new tenons cut. After patching and filling the mortises in the original rails of the sash, new mortises were cut and the repaired sash was glued up. After trimming the tenons and wedges the next morning the sash was returned to neighbour ready for glazing. Can I go back to the workshop now dear?

Ralph.

Monday, 16 July 2012

Back home at last!


There has not been much activity in the workshop for the past couple of weeks as all our attention has been focused around Meccano. We eventually got enough stuff together to display some Looms at Skegness although the thread we had ordered failed to appear in time and we made do with some black and white stuff we sourced locally. The show was a great success and we had a great time sampling the local eateries and of course the New Park Club’ selection of beers!

SkegEx 12 The view from the balcony
At the event we managed to acquire another Meccano loom that was in need of some attention. Unlike the small hand loom that started all this off back in February, this one is at the other end of the size scale. In fact it is too big to pass through a standard doorway and would not fit in Sue’s Volvo. There was nothing for it but to collect it in the van. The only small, shall we say, inconvenience in this arrangement was geographical. We live in South East London and the loom was sitting in a conservatory (it would not go through the door into the house) in Peterlee, Co. Durham. That is a 550mile round trip if you go straight there and back and 600 miles if you do a bit of sightseeing on the way back, as we did. Well you can’t go all that way without having a trip on The Middlesbrough Transporter Bridge and enjoying a fish and chips lunch in Whitby. I will post more detailed information on our Meccano website in due course.

The loom sitting in the back of the van.
Peterlee was Friday, a day out at the North London Meccano Club followed on Saturday and now it is Monday (Spent Sunday recovering) and it is time to get back to the workshop, I am sure there is stuff waiting for me in there… Now, where did I put the keys? … SUE!

Ralph.

Tuesday, 3 July 2012

Thread up with waiting… Grrr!


Loom building is continuing at a pace but with one day until we are off to Skegness I am now getting a bit hacked off with waiting for the thread I ordered last week. I will have to go and find some tomorrow otherwise we will have a loom with no thread. I know exactly what will happen, as soon as I go and buy some emergency supplies, the stuff I have ordered will arrive while I am out, we’ll see…

Sue is working on the beaming frame - and a cuppa!
For now, Sue is working on the beaming frame and I am trying to get the new frame as far forward as possible before we go. I don’t expect to get it finished but I will give it a go. Working from the super model plans and a couple of articles published in Meccano Magazine in the sixties, is hard work. Most of the construction is guesswork as the words are at best vague and when the author gets bored with describing the model he brings the passage to an abrupt end by stating that the modeller will be able to finish the section of the model by close inspection of the photographs – yeah right! 

So how does the reed fix to the slay?
Not only are the photographs not very clear but also there are not enough of them. Some parts of the model are impossible to see, so guesswork and experimentation take over slowing progress to a snail’s pace. Normally this is all part of the fun but with time running out it all starts to get a bit tense. So it is time for a break and to give this keyboard a bit of a work out. Not too much, I don’t want to end up with this on the bench in the workshop.

OK, I feel better now, back to the building…

Ralph.

Monday, 2 July 2012

Our top ten stamps

...and now for something completely different!


If you look at the header on this page there is a reference to "Philately" and so far I have not made a post on this subject. Time to make that right. Both Sue and I are, and have been for most of our lives, stamp collectors. Over the years we have pruned down our collecting to a few countries including France, Italy and Great Britain. By far the most comprehensive is our specialised GB collection that spans all stamp issues from 1840 and pre-stamp material from before that date. Other than the three countries I mentioned above we have lots of obscure items that have just caught our eye over the years. Our top ten selection has been made from stamps we own rather than stamps we would like to own - now there's an idea...

To see our top ten just CLICK HERE

Have you got a top ten stamps? we would love to see them!

You can contact us HERE

Ralph.

Sunday, 1 July 2012

SkegEx 2012 is Looming...

Our new Loom in progress
The only workshop activity that will be hapening this week will be confined to anything to do with getting ready for the premier Meccano event of the year. Skegness is home to SkegEx every year at the beginning of July. Meccano nuts From all over the world meet to show off their latest creations and spend a few days discussing all things Meccano related. But for me the best part is the socialising in the evenings. Great food and good cheap beer, thanks to the hospitality of the 'New Park Club'.

First attempt at a reed hook
This year we will be taking our old refurbished loom, our new loom in a work-in-progress state as well as the Beaming frame. We will also be taking the crown from the Chelsea Flower Show exhibit, that I mentioned in an earlier post, which has a Meccano frame. Our pre-war clock will also make a last appearance. We are hoping our new thread will arrive in time to reload the loom and beaming frame. if it does not get here by Tuesday we might be in trouble! in the meantime I have been out in the Workshop having a go at making a reed hook. you can see my first effort here. After we get Skegness out of the way I will have a go at making a better one but this rather rough first attempt will do the job for now. 


Ralph.