Friday, 29 June 2012

Now let me tell you a story...


If it ain’t broke…

Some days are good days, some days are bad days and others just need to start again. There I am slogging away in the office (building our model for Skegness :-) ) and the postie arrives. Great! That must be the thread I ordered, a few days ago, to reload the old Meccano loom. A hurried descent of the stairs and careful negotiation of the ‘obstacles’ carefully laid out in the hall, delivered me to the front door and, after removing “the wood from the hole” I found myself face to face with a very happy Royal Mail operative holding the wrong size parcel. As the smile on the postie’s face morphed into a grimace of confusion he said “Most people usually look a bit happier then that when I have a parcel for them!” I think my face must have dropped as I opened the door. The problem was the box he was holding was far too small to hold the thread I was expecting. I explained my reaction and thanked him warmly for his trouble. By this time I had worked out what was in my parcel. 


Go to sleep - please!
A few days ago I won a cheap, controlled heat hot air gun on ebay. This Chinese made unit is incredible value for money. There is not much to the unit but what is there works fine. The problem is I didn’t realise how it is meant to work. I know I am a bloke and it is the law that we don’t read the instructions until we have worked out how it works but in this case I had a good excuse. The instructions look really informative, if you read Cantonese…

So, what is it?
It is a controlled heat, hot air gun that has adjustable temperature and flow rate. The really neat bit is it monitors the temperature output constantly adjusting it to compensate for flow rate. It also shuts of when the gun is returned to the cradle. It can be used with or without a reducing nozzle (three supplied) to direct the air flow. I think it will be used most of the time with the small one fitted, as shown in the picture above.

What’s it for?
In a nutshell, it’s for de-soldering components from PCBs and general heat source ideal for heating heat-shrink tubing. It can supply hot air at a rate up to 12L/min and at temperatures between 100ºC and 450ºC. All this for just a smidgen over thirty quid!

“If it ain’t broke, don’t fix it”

This is fine if you know it “ain’t broke” but what happens when you think it is?

Turn it on and is reads 100ºC, pick up the gun and the fan starts, put it down in its cradle, the fan stops and the display reads ‘SLP’ (Sleep).  Good so far. Now, increase the temperature and try it again, guess what? It didn’t shut down… Grrrr!

...it is now!
Out with the screwdriver and (after disconnecting it from the mains) the gun was dismantled. Inside there is a 230V heating element, a neat 24V fan a circuit board and reed switch. I decided that the reed switch must be at fault. In an effort to remove it from the dollop glue and the heat-shrink that held it in place it broke… Grrrr!

At least I now have a real fault to repair. It is at this point, if this was a video blog, you would see me repairing the reed switch in a sequence of speeded up film to a Led Zep soundtrack. Nevermind, it ain’t so you wont! Suffice to say it is OK now. 

It wasn’t the read switch at fault and everything else in the gun looked and tested OK. I placed the gun back in its cradle and turned it on. The display read “SLP” and the gun was silent  I picked it up and it started. Eureka! My delight was short lived. When I replaced the gun it did not stop… Grrrr! Now I am really cheesed off. dialed the temperature back down to 100ºC, watched while the readout fell to 100ºC and placed the gun back in the holder – it stopped! At this point, I decide that the thing is winding me up and was put on this earth to confuse me. Time for a stroll through the grounds of Laughton Towers and forget about it.

All of a sudden it dawned on me Perhaps the fan is supposed to run even if the element has been turned off to cool the thing down. I’ll give it a go. Back to the workshop and I try it out. Sure enough, that is exactly what is going on. If only I had been able to read Cantonese I could of saved myself a couple of hours. To add insult to injury, Sue had been out all day and when she got in this evening I started to tell her about the thing not turning off and she said “Doesn’t the fan just carry on running until it has cooled down?” 

The morel of this story is always make sure you can read Cantonese and if you still can’t work out what’s going on, ask the wife!

Ralph.

Sunday, 24 June 2012

A day out at the sewage works...


As I said yesterday, I was going to take Sue for a day out at our local sewage works… What’s wrong with that? 

The ornate ironwork is being restored to its former glory stage by stage

OK, we are not totally bonkers. Crossness pumping station is the southern outflow of Sir Joseph Bazalgette’s answer to ‘The big stink’ London’s escalating sewerage problem of the 1850s. The government of the time made available vast sums of money to build the extensive sewer system part of which was Crossness pumping station. Crossness boasts the four largest rotative beam engines in the world one of which is fully restored, another is in the process of being stripped down and the other two are awaiting their turn. The place is a palace to Victorian engineering at its most arrogant. The interior was decorated to a standard that would not lookout of place in a grand hotel of the day. Money was obviously no object. Lots more information can be found on the Crossness Engines Trust website

Hummm... That bloke looks familiar. The loom always attracts attention
Today was a steam day and model engineering show. We (SELMEC) were invited to display a selection of Meccano models. We did and a good time was had by all. Sue and I took our partially restored Meccano loom and a clock based on some instructions, found in a 1930’s manual, along with a dealer display windmill. As usual, the loom attracted the most attention from children (of all ages), Mums and Dads. For more details of the loom, see HERE

 
Sue is a steam engine and early architecture junkie. She was in her element there enthralled by the whole event. Not only are the engines really impressive, they are housed in Grade I listed buildings. If you get a chance to go, don’t think twice the place is fantastic and it would make a good day out for the whole family. There are modern facilities and sensibly priced refreshments are available.

For me the trade stands are my nemesis, I can’t resist a bargain. Several visits to the second-hand book sellers, during the day, increased our book collection but my star purchase as far as I was concerned was a pile of vintage Airfix 1/35 scale military kits for a few pounds each.

All in all a good day out and the end of a gruelling two weeks of holidaying in Scotland, attending a Meccano meeting and steam show. Now we have ten days before setting off to the biggest Meccano event of the year in sunny (please) Skegness!

Ralph.

Saturday, 23 June 2012

Back home and up and running...


Wow! Those two weeks just whizzed by. There is a lesson here for next time. The place we wanted to stay was booked for the weekends but had free space Monday to Friday. So we decided to book it and find alternative accommodation for the following week, Friday to Friday. The problem with this idea is that three of the days were taken up travelling. We were only away for twelve days so that left nine, Three of them were spent avoiding the torrential rain, and another couple resting after long drives with Mum. Now we are down to four days. We made use of the time but I must admit, it could have been planned better. Next year we will book two weeks in one place! Tonight, My brother repatriated Mum to Kent this evening, after consuming large quantities of our meagre food supply, so now the holiday is really over.


The upshot of all the mucking about and inclement weather was there was little time to get out and about photographing possible modelling subjects with the exception of one brief stop at Dunkield Railway station, on the way back from a visit to the Pitlochry salmon ladder – Google it! The station was originally the terminus of the Perth and Dunkield Railway in 1856 and later became a trough station when it was absorbed by of the Inverness and Perth Junction Railway in 1863. I think it would make a nice subject for a modern-image layout as it still has a couple of sidings, a signal box, semaphore signal and a passing loop. The permanent way crews use the sidings for storage of materials and equipment. The line sees all sorts of traffic including freight and passenger, local and national. Check out Google images for Dunkield Railway station and you will see what I mean. I liked the combination of wooden and concrete sleepered track forming the running line and passing loop respectively. 


The rest of the pictures taken were either for use a reference later or just plain holiday snaps and not really worthy of being posted here.

Today, have been at a Meccano meeting (SELMEC). I have made a bit of a rod for my own back by offering to PAT test the club members gear. I spent another meeting unscrewing plug tops!  I am only going to do it once a year in future other wise I can see me spending all my time working. Don’t get me wrong, I am not complaining, I just underestimated how many members would need gear tested.

Tomorrow I am taking Sue for a day out at the local sewerage works –  See, we know how to live it up!

Ralph.

Connected!

As I suspected there was no way of connecting to the internet at the second location. I could get a 3G connection on my not-so SmartPhone but this was so painfully slow it was not worth considering.

Now we are back home and I am about to rush off to a South East London Meccano Club (SELMEC) Meeting - details can be found on our Meccano website. I will try and make a longer post this evening once my brother has collected Mum - and yes, after two weeks, 9 hours and 17 minutes, we are still talking - just!

Ralph.


Friday, 15 June 2012

No connection - maybe

Mum's driving! At the wheel of RRS Discovery
 Today we are leaving this wonderful place here in Scotland and heading for Berwick-upon-Tweed for the second week of our holiday. I have no idea when or if I will be able to get a good connection down there, so if it all goes quiet for a while you will know why!

Ralph


Tuesday, 12 June 2012

On the road - Dundee...

The recycled fridge, luggage and three humanoid figures arrived in the land of haggis and bagpipes late yesterday afternoon and after avoiding boarder patrol we eventually, 449 miles later, we arrived at the cottage we had booked after an internet search. This can be a bit of a risky business – not this time.   What a place! The instructions of how to get here casually described following the drive to the top and then… Well, what a drive, it must be a mile long! At the top of the drive we found our cottage, part of a converted stable complex, complete with everything you could possibly need including Wi-Fi.


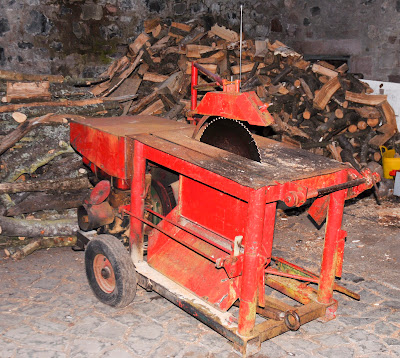
Under the covered part of the yard I found something of interest to a workshop owner with the start of withdrawal symptoms, a circular saw, I wonder if they will let me have a go? This petrol driven monster is obviously used for chopping logs for the open fires. There is a lot more to explore here, we are in 100 acres of private woodland and gardens and we have free run of most of it. I’ll post a few more pictures over the next few days.


Today we went to Dundee, 12 miles up the road and managed to catch the Olympic torch relay, while dodging showers in the town centre. Tomorrow we will be going back to visit RRS Discovery which is on display in a purpose made dock. I remember Discovery being moored on the Thames in London as a training ship. It had no engines as they had been stripped out and used as scrap to help the 39–45 war effort, and as far as I know they were never replaced. Her journey from London to Dundee was made in a transport ship.

Ralph.

Sunday, 10 June 2012

On the road – well, almost…


Every now and then, there comes a time when the workshop has to be locked up and left under the careful watch of the neighbours. For the next couple of weeks the tools will be dormant, the waft of solvents and flux will subside and the resident colony of arachnids will be free to build a great metropolis of silk, dust and insect carnage. Yes, it is time for a HOLIDAY!

There comes a time when the tables are all reversed. As a kid I used to look forward to the summer holiday, bucket and spade in hand, ready to rearrange the sea defences at Dymchurch and build a castle to help fight of all invaders. These plans were usually thwarted by the incoming tide or one of the’ big kids’ who’s idea of fun was ruining mine…

Happy days! How things change. Now I am sitting here typing this on a Sunday morning and the schedule is as follow:

1000 hours – Tune in to Radio 4 to catch up with The Archers
1115 Hours – Collect together ‘important’ items ready for holiday and check oil and tyre pressures on the recycled fridge.
1230 hours – Lunch!
1300 hours – Depart to collect Mum.
1400 hours (approximately) Arrive at Mum’s
1430 hours Bundle (Sorry, help…) Mum into car and return to London ready for tomorrow.

… Monday, 0500 hours leave The Smoke and head North attempting to beat the morning rush.

There is a theme developing here and for the next couple of weeks it is our turn to look after Mum and entertain her, just like she and Dad did for me all those years ago. 

That's the essentials packed. Have you worked out what is there...
While Mum is packing her bucket and spade, I have been busy sorting out the essentials. No I am not talking about all the clothes, wash things and other incidental stuff. That seems to look after itself and ends up in the cases. My only job regarding all that (other than lifting it into the back of the car) is to inspect the contents on arrival and then spend the next couple of weeks moaning about the fact that my favourite pair of socks was left behind. You just can’t get the staff these days.

No, I am taking about the really important stuff. They say a change is a good as a rest and, for me, it is. I am not one for taking token bits of my hobby on holiday, no, that can have a holiday too. For the next couple of week I will be on the lookout for prototype inspiration. We are off to Scotland and North East England so I will be armed with survey tape, pens paper cameras etc. with an eye on the world around us. Not having an accent myself (born and lived in South East London my entire life) I usually find it hard to understand the locals, but I will have a go. What I don’t get is they keep asking me to repeat what I have just said – strange…

I will be collecting prototype information on everything from the colour of the dirt to the form of the trees. I particularly like studying the grotty bits, especially the accumulations of rubbish, overgrown and neglected areas, graffiti and the general decay. All of this is seldom modelled and can really add to the scene.

For the next couple of weeks, as long as I can get on line, I will post my adventures and show you what we have found in the way of relevant material. Now what did I do with my knotted handkerchief? 

Ralph

Friday, 1 June 2012

Messing with LEDs

LED specifications. Don't you just love a good chart?
All this information is readily available on the internet, just Google it!
I have never been interested in electronics for electronics sake. Perhaps I should have been, as I would know a lot more about the general stuff now. For me, the electronics were a means to an end. I would build a kit or follow a diagram without really understanding how it worked, being satisfied in the knowledge that it did what I wanted it to do.

Way back in the days of rebuilding and tinkering with my old 1970 Ford 1600E Cortina (remember those?) I wanted to add intermittent wiper control. I could have just bought a unit and screwed it in place. In those days there were car accessory shops and/or motor factors on every corner. There was very little in the way of electronics built into a car then, even a top of the range model like my 1600E. The systems were mostly, if not totally, electro-mechanical. The wiper control had two speeds, too fast and too slow! Most cars of the period were similar so aftermarket bolt-ons were readily available and popular.

Not being one to go down the bolt-on-goody route I saw a project in Practical Wireless on building one. It looked simple, and it was, just a few components soldiered to a printed circuit board (supplied by PW) and it was done. The parts were duly acquired; the unit was built and installed. It worked fine and was still in the car when I sold it some years later. Yes, I had built it, and installed it but I had not bothered to find out how it worked. It probably explained all that in the original article but I would of skipped that bit at the time being more interested in improving the performance of the wipers than understanding how it worked.

Forty years on my attitude and interest has changed somewhat. For a start our vehicles are very different today. There are few places to buy car parts or accessories as most cars come with everything under the sun including hot and could swinging doors! And, they are full of electronics. The net result being, in the past I could strip down and rebuild a car (every last nut and bolt) and be confident that it would start when the key was turned. Not any more. Even the van has all sorts of electronic engine management systems incorporated and buried in the most inaccessible places. I now leave the automotive stuff to others and concentrate on the model making – much cleaner! These days I have the time and the inclination to try and understand what is going on, hence my revived interest in electronics.           
The LDR is located in the frog's mouth

Do you remember that pound-shop croaking plastic frog? I decided to have a go at using the croak output to drive an LED as had been suggested by someone on the EEV blog forum. I ‘extracted’ the PCB, battery box and speaker from the frog and discovered the LDR in its mouth was hard-wired and needed the application of the wire cutters to remove it. To test the theory, I set up a little experiment on a piece of breadboard to see what, if anything, would happen. A pair of leads were soldered to the speaker terminals and the other ends are plugged into a couple of tracks of the breadboard with an LED places across them.

Snip! that could almost make your eyes water!
I had already cut the LDR from the circuit while extricating the guts of the frog. I replaced the LDR trigger with a read switch, that just happened to be handy, as any movement was causing the LDR to trigger the frog into making three double croaks, driving me nuts! The read switch made it much more controllable. I could of used anything that would ‘make’ the circuit. The LDR has a minimum resistance if full daylight of approximately 100 Ohms and maybe I should have incorporated a 100 Ohm risister in series to the reed switch but it seemed to do the job without.

This is what a frog's croak looks like! I know, I must sort out some video...
 I should also of added a resisters to limit the current being supplied to the LED but I think the IC under the ‘blob’ must have provided some current limiting as it too seems to work OK. Measuring the voltage being applied I get an approximate maximum voltage of around 4V. A red LED of this size (5mm) is happy to operate at around 20mA (.02A) and has a forward voltage about 2V. All this information is available from data sheets or charts, readily available on the web, like the one illustrated at the top of this post. The voltage across the LED is Vs – Vf (supply Voltage – forward voltage) in our case this is 4 – 2 = 2. Using Ohms law (V=IR) transformed to R = V/I to work out the value of the resistor required:

R = (Vs - Vf) / A  =  (4-2) / .02  2/.02  =  100 Ohms

Now all I need to do is find a use for my discovery… Glowing embers, or a dodgy flickering light in the station’s waiting room.

LEDs and Meccano


Moving away from the model railway applications, Sue has always been keen on lighting our Meccano models. Suggesting she uses her 1935, boxed and strung, lighting kit may lead to a cries of “How could you?” and result in me having to cook my own tea for a week or so. Better look at a more 21st century solution. 3mm LEDs will, with a bit of persuasion, mount in a Meccano hole using a 3mm plastic LED clip. This is intended to fit into a 4.4mm hole but a spot of ‘percussive maintenance’ (to use a Dave Jones, of EEV blog, phrase) will get the thing seated. With this in mind, I decided to get the Arduino and breadboard out and have a go at prototyping the electronics. My mate Tim (chief programming nerd and all-round techie-geek) was here last week messing with stepper motors and we had the Arduino out to drive them – but that is another story – When he had gone the stuff was still sitting there next to the computer so I refreshed myself with what was going on and saved the ‘sketch’. Why Arduino insist on calling programs ‘sketches’ has passed me by. Maybe I am just getting old…

Four LEDs running light only needs one resistor
The Arduino software comes with several example sketches (Grrr!) one of which is an array of LEDs. The example sketch was written for six LEDs and the run is supposed to reverse, lighting the LEDs in a 12344321 sequence but I wanted to use two groups of four to simulate a simple running light by running in a 12341234 sequence. Having messed with the Arduino for about 36¾ minutes in total, I now consider myself an expert and duly modified the sketch to suit my needs – Confirming my total understanding of the subject the modifications worked first time – Nobody was more surprised than me! I now had my little experiment working using four LEDs and one resistor as only one LED is lit at a time.

Running lights working wired in parallel - not the best solution
Next, I need to expand the idea further. Initially, to extend the LED run I added the extra four LEDs in parallel to the existing array. Although this did work, as I discovered later, it is not the correct way to do it. Further reading illustrated that wiring LEDs in parallel is not a good idea. I am not going to try and explain the ins and outs here, as I am only a beginner on this subject myself. If you want to know more take a look HERE at The Electronics Club. This is a really good website for just telling you the basic facts and pointing the reader in the right direction.

That's better now wired in series pairs - works a treat!
A simple bit of rewiring and a recalculation of the resister value gave me four pairs of LEDs wired in series with a 68 Ohm resister. Calculating LEDs in series is simply a matter of adding the Vf of each LED and deducting it from the Vs. This figure, in this case  5 – (1.9 x 2) = 1.2, is then divided by the preferred current of 20mA (0.02A) giving a resultant figure of 60. As there is not a standard resister value of 60 Ohms the next higher value (68 Ohms) is used. I plugged it back into the power and off it went.

One more small step forward and some more knowledge gained has given me a sense of achievement. That’s enough electronics for now, time to get back to the modelling!

Ralph.